Quantcast

Manitou Dorado Exposed

Orvan

....................
Mar 5, 2002
1,492
2
Califor-N.I.A.
Alright, I've been getting a lot of PMs and email lately as how to give Dorados some TLC... I don't mind helping you all out at all but I thought I'd give a lil expose' on how to do it yourself with a lil pictionary.

TODAY'S TOPIC is brought to you by the nice guys at Nicolai Bikes:D
LUBING IT UP!

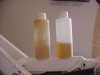
First thing you need to do is figure out whether you have the 02 model or the 03. Diferences, 03 has the new Evil Genius seals which uses a different kind of lubrication. Oil instead grease, hence semi-oil bath on all evil genius equipped Manitous.

More than likely, you have an 02 model with the regular seals.
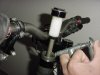
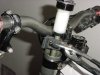
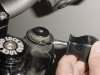
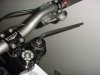
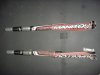
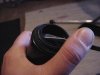
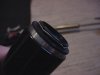
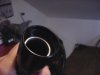
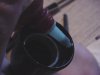
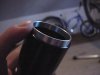
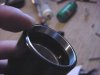
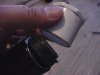
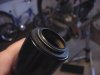
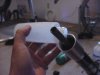
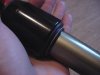
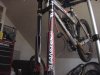
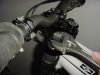
Left leg is the spring side and the right is the damper side (viewed seated atop the bike). First, the easy way to lube your Dorado. Undo the top cap on the spring side with a big crescent wrench (forgot what size in mm it is exactly). Note: Before you do this and you're running a flat top crown (not the dropped one), make sure to loosen the top crown clamp bolts (4, two on each side).
 

Attachments

Orvan

....................
Mar 5, 2002
1,492
2
Califor-N.I.A.
Once the spring side leg top cap is undone, the fork should drop by this time exposing a shaft that is still attached to the top cap.
Now for the easy and lazy way to lube the fork: Simply squirt/drop grease from this point. Make sure the grease is shot directly down towards the bottom (not too excessive of an amount) by the seals.

For the 2003 Dorados, this is the same procedure to be done to squirt the oil when the lubrication has dried up. A syringe is a nice thing to have to squirt the oil.

Once done, replace top cap.
 

Attachments

Orvan

....................
Mar 5, 2002
1,492
2
Califor-N.I.A.
The proper way to lube it is to remove the lower/stanchion from the uppers to lube and clean the seal area.

Follow the same procedure to undo the top cap on the spring side leg. The lower spring side leg is attached to the top cap via the shaft. On the exposed part of the shaft, clamp a vice (a rubber clamp vise tool is available thru Manitou) over with something to prevent the vise teeth from marring of gouging the shaft. Do not apply a lot of force either as the shaft is a hollow aluminum piece. Once the shaft is clamped firmly, continue to undo the top cap from the shaft. Once top cap is remove, the lower/stanchion will come out of the upper. Clean and regrease/lube the internals of the upper from the bottom. Reinsert the lower leg back and replace the top cap. Slide down the top cap along with the leg and rethread it.
 

Attachments

Orvan

....................
Mar 5, 2002
1,492
2
Califor-N.I.A.
Now on the damper side:
The easy way is to remove the top cap, same procedure as the spring side, and squirt the grease or oil (on Evil Genius equipped forks) from the top. Rethread the cap and viola.
 

Attachments

Orvan

....................
Mar 5, 2002
1,492
2
Califor-N.I.A.
The proper way, which involves removing the leg, are as follow:

First, remove the aluminum rebound adjuster knob by wedging a flat screw driver in between the knob and top cap and then pop it up.
 

Attachments

Orvan

....................
Mar 5, 2002
1,492
2
Califor-N.I.A.
Once the knob is removed, you will see a silver/chrome 8mm nut. This is the nut that holds the lower onto the upper leg. Unscrew this with an 8mm hex allen key. The lower leg will come off and relube/grease and clean the seal area from the bottom of the uppers.

Once finished, reinsert the lower into the upper. Replace the 8mm nut onto the shaft from top and pop the rebound adjuster knob back in.
 

Attachments

Orvan

....................
Mar 5, 2002
1,492
2
Califor-N.I.A.
There is no myth involved in the maintenace of the Dorado. It's just a matter of knowing what the hell you should be doing.

A few reminders: When you're just lubing the fork from the top, you can leave the front wheel on. It will make it easier for you to drop the fork to its lowest level and be easier to squirt the grease/oil down.

When you're disassembling the lowers, you will need to take the front caliper off the lower or if your caliper is shimmed like mine, I just take the lever off the handlebar.

Non evil-genius users, if you're using the new motorex grease (which is thicker and stickier than the Maxima Prep M) for lubing, it will be beneficial to mix it up with a bit of motorex fork oil (used on evil genius sealed forks) or if the motorex oil is not available, you can use over the counter slick 50 to dillute the motorex a bit. Caution: Do not make it too runny or it will just leak out of the seals all over the lowers/stanchions (maybe even onto your rotor from splashes).

Hope this helped..

Nexct topic: How to overhaul your old Hope DH4s....(if I'm bored then like I am now):devil:
 

Attachments

spincrazy

I love to climb
Jul 19, 2001
1,529
0
Brooklyn
Nice job Orven. We need more of things like this on here. Perhaps this will inspire others to post step by steps of their overhauls, etc.
 

El Jefe

Dr. Phil Jefe
Nov 26, 2001
793
0
OC in SoCal
Very cool info Orven (of course I don't own a Dorado, but it's still cool.)

Pack your bike and head up here for an afternoon Aliso drop. I have my truck ready to shuttle.
 

Orvan

....................
Mar 5, 2002
1,492
2
Califor-N.I.A.
Originally posted by El Jefe
Very cool info Orven (of course I don't own a Dorado, but it's still cool.)

Pack your bike and head up here for an afternoon Aliso drop. I have my truck ready to shuttle.
can u still ride tomorrow.?. traffic out of SD at this time will be horrendous buddy....
 

FlipSide

Turbo Monkey
Sep 24, 2001
1,384
818
Nice job!

I would be so nice to have such detailled procedure for most of the popular forks!
 

Orvan

....................
Mar 5, 2002
1,492
2
Califor-N.I.A.
Originally posted by IntenseKid
Great work orven ! is it pretty easy ! it looks it , might attempt it tommorow
thanks..
yes, it's pretty straightforward... just take your time for the first try.. it will become a mindless routine as you go along...

cheers mate!
Oz
 

Orvan

....................
Mar 5, 2002
1,492
2
Califor-N.I.A.
Originally posted by LOOnatic
Great Idea,
Orven's next assignment is the overhaul of a 2003 Boxxer Team.
Coming soon :p
that's easy.... take the Boxxers off the frame...clean it...put it up on sale or trade for one of em Shermans....:devil:
 

Orvan

....................
Mar 5, 2002
1,492
2
Califor-N.I.A.
Well... after some careless chemical experimentation and what not, one of the Evil Genius seals developed a leak. So I thought today would be a good day to replace the seal after lunch.

Stuff you need:
The Dorado fork ofcourse
Evil Genius seal and aluminum ring replacement
Red Locktite
Seal Press (or Orven's ghetto tool, 1 1/4" Plastic PVC pipe, 49 cents)
Flat head screw driver
Rubber Mallet
5w40 motor oil
Drain bucket
Lots of rags/paper towel

first step.
Take both fork legs off the crowns..
 

Attachments

Orvan

....................
Mar 5, 2002
1,492
2
Califor-N.I.A.
Make sure to wipe the fork legs and its crevices clean of smudge and gunk so that nothing can worm their way up the internals during disassembly.
Today I worked on my spring side leg (the left one)
 

Attachments

Orvan

....................
Mar 5, 2002
1,492
2
Califor-N.I.A.
Refer to the start of this thread on the lower leg disassembly procedures.
Before you do this, make sure to have a drain bucket or pan ready to catch the remnant of the lubricating oil left above the seals.
After draining the leftover oil, wedge the flathead screwdriver just below the evil genuis seal. (There is a ridge in between the seal and the bushing... do not touch the bushing). Pry the old seal out.

wow...what a nice hand:D
 

Attachments

Orvan

....................
Mar 5, 2002
1,492
2
Califor-N.I.A.
Normally, the aluminum ring will stay on the fork uppers when the old seal is plucked out. I guess I pried it a bit too much..:D
No worries, I have several spare parts.

Discard the old useless seal
 

Attachments

Orvan

....................
Mar 5, 2002
1,492
2
Califor-N.I.A.
Once the seal is out, meticulously clean the seal contact surface good. Make sure that this crucial area is free of oil or greasy substance. I use Pedro's Degreaser agent ( I substitute that sometimes with warm detergent water or alcohol).
Let it dry.
(the white material visible is the fork bushing..inspect it for visual marring or gouges while you are it)
 

Attachments

Orvan

....................
Mar 5, 2002
1,492
2
Califor-N.I.A.
After you religously cleaned the seal contact surface and waiting for it to dry, prepare the following.

1. Red Loctite
2. New Evil Genius Seal
3. 1 1/4" Plastic PVC (or the special Manitou seal press tool)
4. Aluminum ring (setter)
 

Attachments

Orvan

....................
Mar 5, 2002
1,492
2
Califor-N.I.A.
Allign the aluminum ring and press it in. Some light tapping may be needed to assist it but I was able to press it in snug with one hand.
 

Attachments

Orvan

....................
Mar 5, 2002
1,492
2
Califor-N.I.A.
For assurance, use the 1 1/4" PVC pipe to make sure the ring is set flat on its place. Tap the pvc with the mallet over the ring lightly just to make sure it set properly.
 

Attachments

Orvan

....................
Mar 5, 2002
1,492
2
Califor-N.I.A.
Wait for a minute or so for the loctite to dry.

Set the fork upper upright on something padded (pile of rags and such) against a hard surface (floor). Grab the evil genius seal and align it for install. Place the 1 1/4" PVC pipe over the seal and lightly tap the seal into place using a rubber mallet. Once the seal is almost halfway, you can increase the tapping until the seal is properly set.
 

Attachments

Orvan

....................
Mar 5, 2002
1,492
2
Califor-N.I.A.
Get ready to insert the lowers back up on the carbon upper. Just backtrack the disassembly procedure as you should know by now.

Note: The MRD techs place a copious amount of motorex (prep M is cool) grease around the bushing and seal area before they install the lowers back onto the uppers. This helps eliminate initial stiction before the added lubricating oil does its work. This tip works especially on brand new parts (replacements and such).

So insert the lower (stanchion) back up on the upper carbon leg. From the top of the uppers, pour 10cc of 5w-40 motor oil into the leg. IMPORTANT: DO NOT PUT IN MORE THAN 10cc!!!! When you put far way too much oil for the lubrication, the fork builds pressure inside. This does not affect damping but can and will cause two things to take place. One: Fork will be unable to get full travel. Two: The pressure may build up and force the seal out of its seat or blow the evil genius seal out.
5w40 motor oil isn't as common as I'd hope it would be so in its absence, I use a mix of slick 50 diluted in motorex grease (subtitute Prep M if you don't have Motorex). The key is the texture. The lubricating oil cannot be too runny or it will just seep out of the seals.
 

Attachments

Orvan

....................
Mar 5, 2002
1,492
2
Califor-N.I.A.
After the leg assembly is complete. Compress the leg twice or so and observe the stanchion for any signs of obvious leak. Some residual ring of oil may appear, that's normal!
 

Attachments

Orvan

....................
Mar 5, 2002
1,492
2
Califor-N.I.A.
Reinstall the fork legs and enjoy months of riding...

Actual Work Time: 36 mins
One Diet Coke can
several paper towels
two missed phone calls

Disclaimer: If your non-mechanically inclined hands screwed up and parts are broken, I hold no liability or responsibilities for your action. This is just a guide/tip and not an endorsed Manitou service manual. If you blame me, I will wire you a singing telegram with the duo of Jackie Chan and Jean Claude Van Dam to drop kick you silly.. Otherwise, to fellow Dorado owners, I hope this helped!
 

Attachments

Orvan

....................
Mar 5, 2002
1,492
2
Califor-N.I.A.
this thread just got sticky???? wow!:D

After a full afternoon of bashfest and jumping, the seal worked just as it should and didn't leak...
chalk one up for Ozzer!!
 

Orvan

....................
Mar 5, 2002
1,492
2
Califor-N.I.A.
Originally posted by LOOnatic
Looking good but how do you cope with all the flex?
I'm stomped..next time you swing by my pad you stand in front of the bike while I'm seated and you hold onto the bar, twist it sideways while clutching the front wheel between your legs. That way we can accurately and officially measure the degree of flex....coo?
 

|S2|

Chimp
May 1, 2003
40
0
Ventura
Thanks for the dorado maitainance info, that will very helpful.
Do you have any words of wisdom regarding headset adjustment? This dorado is the first dc fork I've owned and it's a little difficult to figure out the right adjustment.
 

Orvan

....................
Mar 5, 2002
1,492
2
Califor-N.I.A.
you bet S2
for the headset adjustment, you mean tightness? I use Azonic headlock cuz the star nut just didn't cut it for me. There was way too much stress generated by the upper crown/integrated stem combo found on dorados. I needed constant tightening of the headset preload cap before the headlock.

For adjustment, find the right spring rate! That's the magic touch. Reb and Compression are all personal! For index, I weight 165 lbs (before the carne asada burrito) and I run blue and red spring combo. I chose this setup to run my fork's initial stroke real linear...I prefer it that way. Some guys in my weight range stick with two red springs. I find it a bit harsh for my liking. If you will be running dual rate (diff colors) springs, make sure the softer spring is on top of the firmer one (ex, blue on red...like mine).

Enjoy and don't fuss too much about it. The high "maintenance crap" is a myth if you're well-informed (as you should be by now after going through this thread)!:cool:
 

|S2|

Chimp
May 1, 2003
40
0
Ventura
Thanks for getting back to me. Yes, I'm mainly concerned about the preload on the headset. It seems like I tightened it down enough without it binding, but I get an occasional click when pulling the front wheel off the ground. It still feels tight when I check for movement around the headset. I wouldn't think that after torquing down the upper clamp that it would come loose. Perhaps I'll try the headlock. Thanks also for the spring info, that's very useful, I'm in that same weight range.
 

blong

Monkey
Sep 25, 2001
124
0
San Diego
Originally posted by Orven
If you will be running dual rate (diff colors) springs, make sure the softer spring is on top of the firmer one (ex, blue on red...like mine).
Why?

I'm thinking about going with stoner's hard-soft setup. To change the springs, do you just take off the wheel and yank the lowers out?
 

Orvan

....................
Mar 5, 2002
1,492
2
Califor-N.I.A.
Randolph,
If the damper is working fine I usually leave it alone...bleeding is a mess at times.
On full blown service:
I go to the same extent as your pic illustrates. I even wear latex gloves so I can spend all the time polishing every part clean of grime and snot. It's just nice to tear it apart and start from scratch so I don't leave anything out. Sometimes people give me their dorado with a misdiagnosed problem bec they're not familiar with the layout. So I usually troubleshoot it myself.


Brian, you don't have to take the wheel off to change the springs.
Just unscrew the 20mm socket cap at the bottom of the spring leg. The spring stack comes out. Just be careful screwing the cap back.. make sure it's lined up staright so you don't run the chances of stripping the thread...but you're a bona-fide mechanical engineer so you knew that.! :D
 

|S2|

Chimp
May 1, 2003
40
0
Ventura
More dorado questions. My fork is making a noise that does not seem right. It's basically a clunk that seems to happen on the rebound stroke. I initially thought it was the headset, but I don't think so now. It sounds like it is coming from the rebound side halfway down but I'm not sure. It does not seem to change if I adjust the rebound, but when I back out the comp adj it makes the noise really easy, if I set it to full comp it happens less easily. Any help would be greatly appreciated this is driving me crazy.