Cracked my bike last night
- Thread starter Jm_
- Start date

booo. interested to see what you're doing for the repair. might try it on my old nomad. post steps?
There's a pretty good write-up here: https://forums.mtbr.com/general-discussion/carbon-frame-repair-1101743.htmlbooo. interested to see what you're doing for the repair. might try it on my old nomad. post steps?
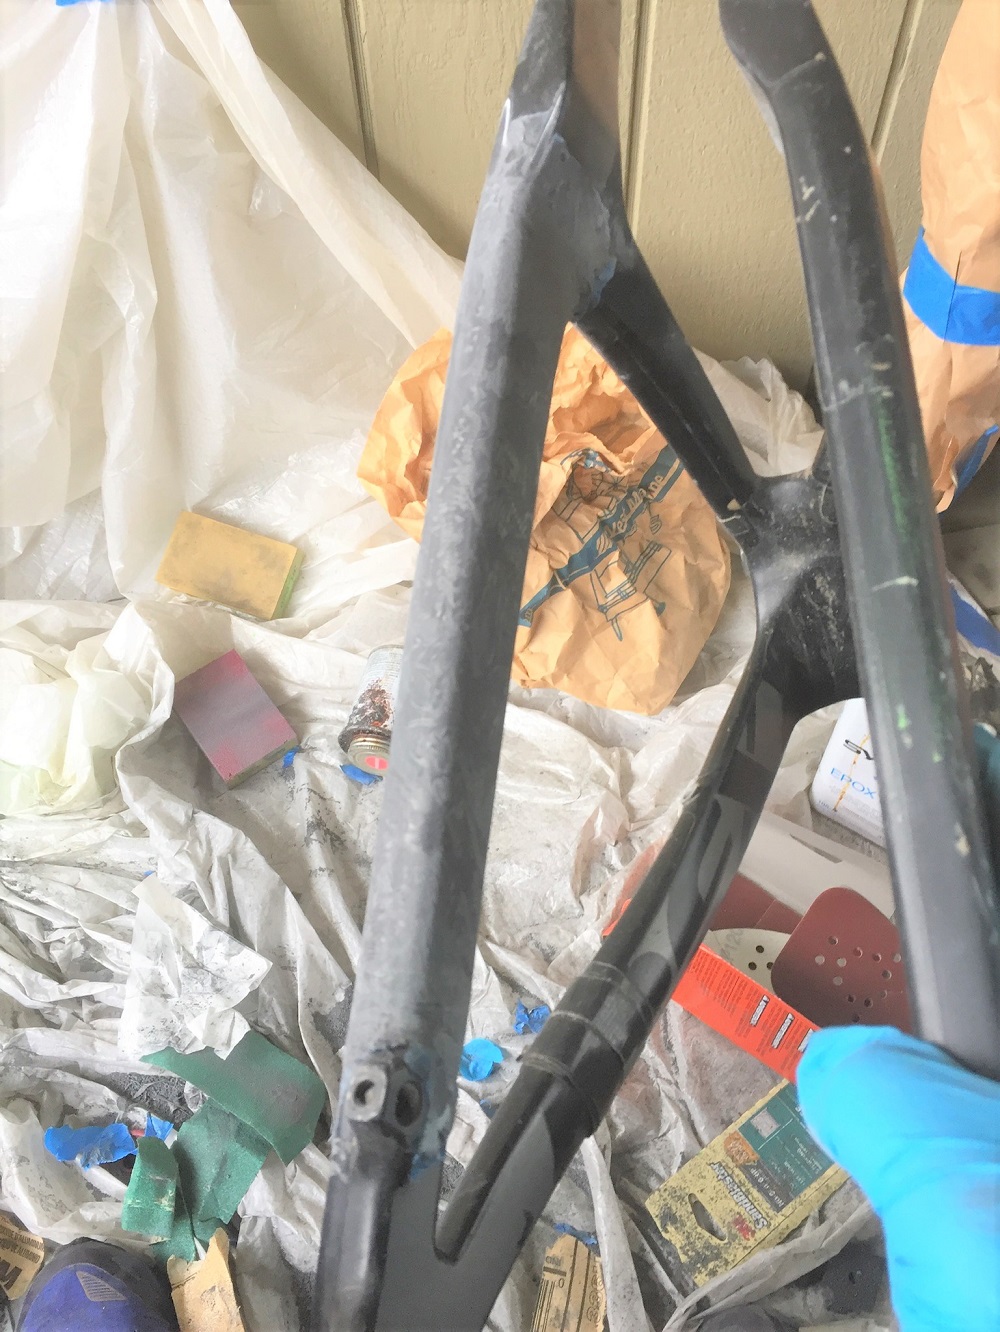
Basically, there's a sh*tload of sanding, both before, and after the CF is applied. You need to get the CF on there in a structural way (thread above is a good illustration) and then you got a whole bunch more sanding after it's cured. I tried to get a close-up of the crack after sanding here, but it was hard to get the right angle with light, so it's oblique unfortunately. Interestingly, from a carbon frame perspective, the turner seems pretty nice, there was the paint, and then that white layer, then what seemed to may be clear coat, then finally the dark carbon (you know when you hit it with the sander). Unfortunately, it's kind of hard to get around all the curves and bends, so again, it's fairly tedious.

That's the RFX rear end.Jeez, good luck with this. What frame is that?
Maybe next time go for the cheaper rake.
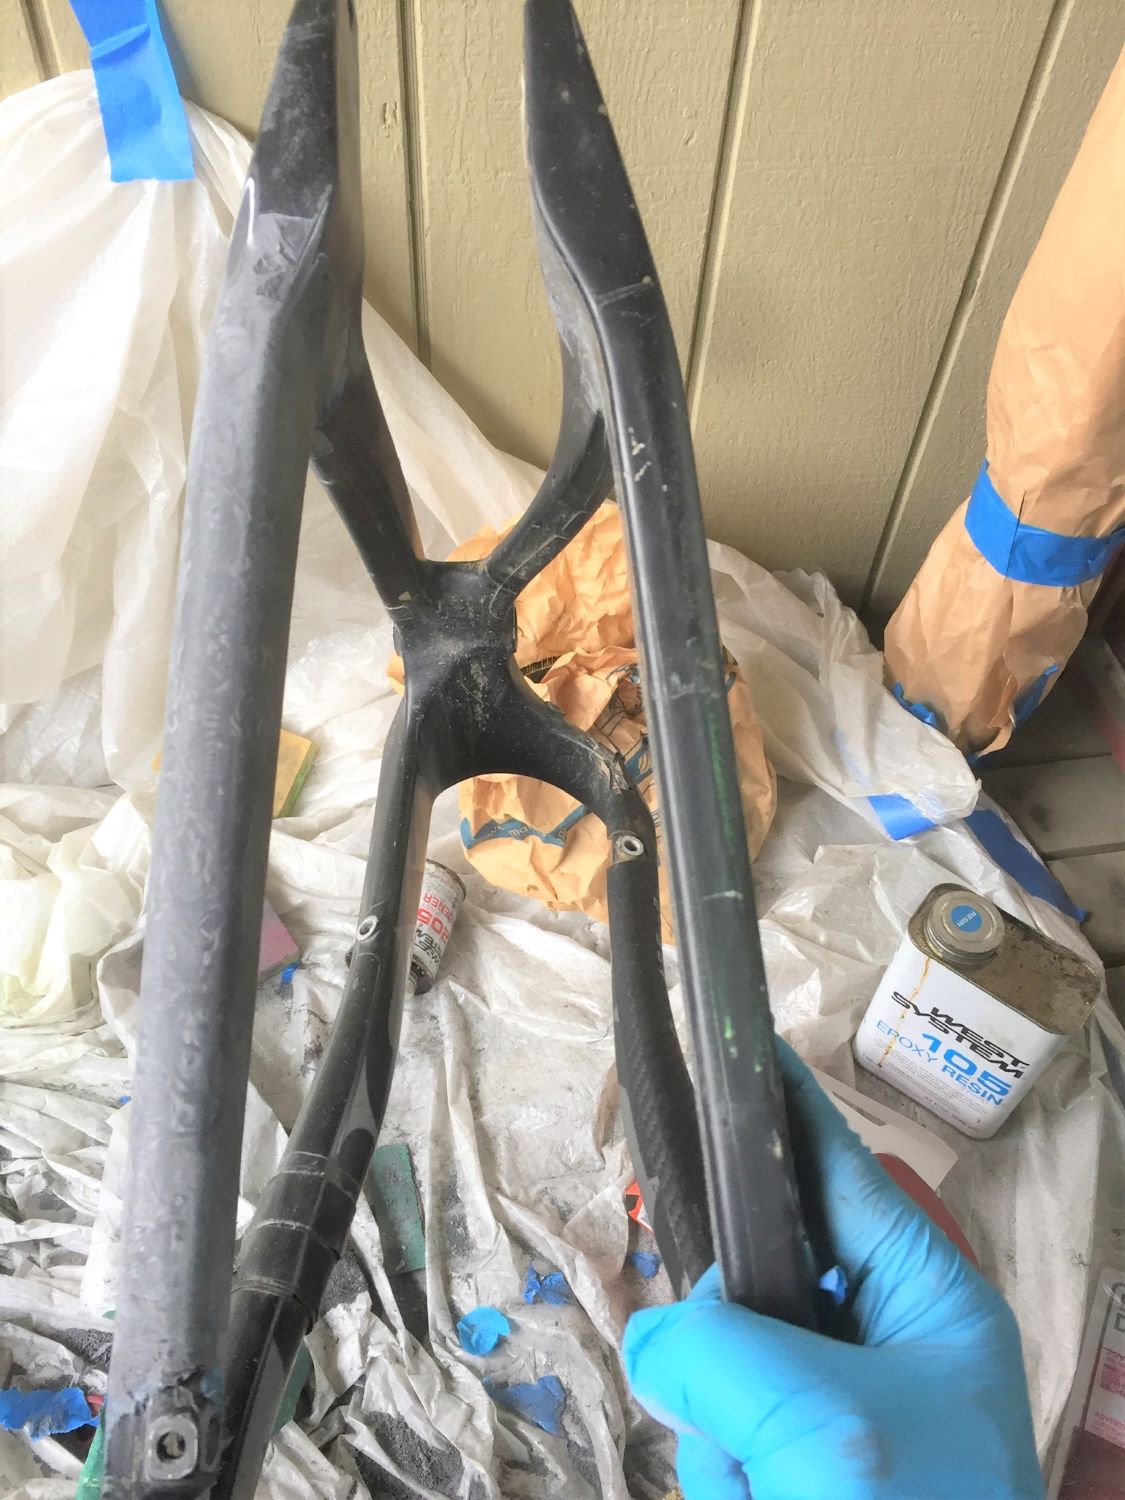
So like my previous run at this, no pictures while laying the carbon fiber, it's just too damn messy to attempt photos. Once you open it up and start cutting it with scissors, it just gets everywhere. Really, when you just take it out of the damn box/paper. So PPE is very important, a respirator at basically every step for CF dust/fibers. Ample supply of nitrile gloves. I'm not sure a full body painters suit is necessary, but I'd put on some clothes you don't care about and immediately change out of them after.
Picked up a yard of CF at local industrial composite supply shop.

As with any composite, it hardens to the temperature of the day, meaning the warmer the day, the stronger the cure and strength. This typically isn't a huge issue unless it's 50 degrees and raining outside (thankfully it's the opposite of that today, warm and sunny). It wouldn't make any sense to cure in cold damp area.
The CF is pretty damn fragile by itself, that's the first issue to work around. Cut bigger than you think you'll need, the edges fray all over the place. Cut more than you think you'll need. I did and it was barely sufficient. I ended up laying 4 strips in a helical pattern and then a bigger cosmetic layer over it. It ends up being pretty ugly usually at this and the next stage. The tape squeezes the air out and helps eliminate voids, it's medical tape, which is porous and the resin seems to go right through it (good). All in all this part is messy as hell, carbon goes everywhere, resin drips everywhere, have extra gloves nearby.
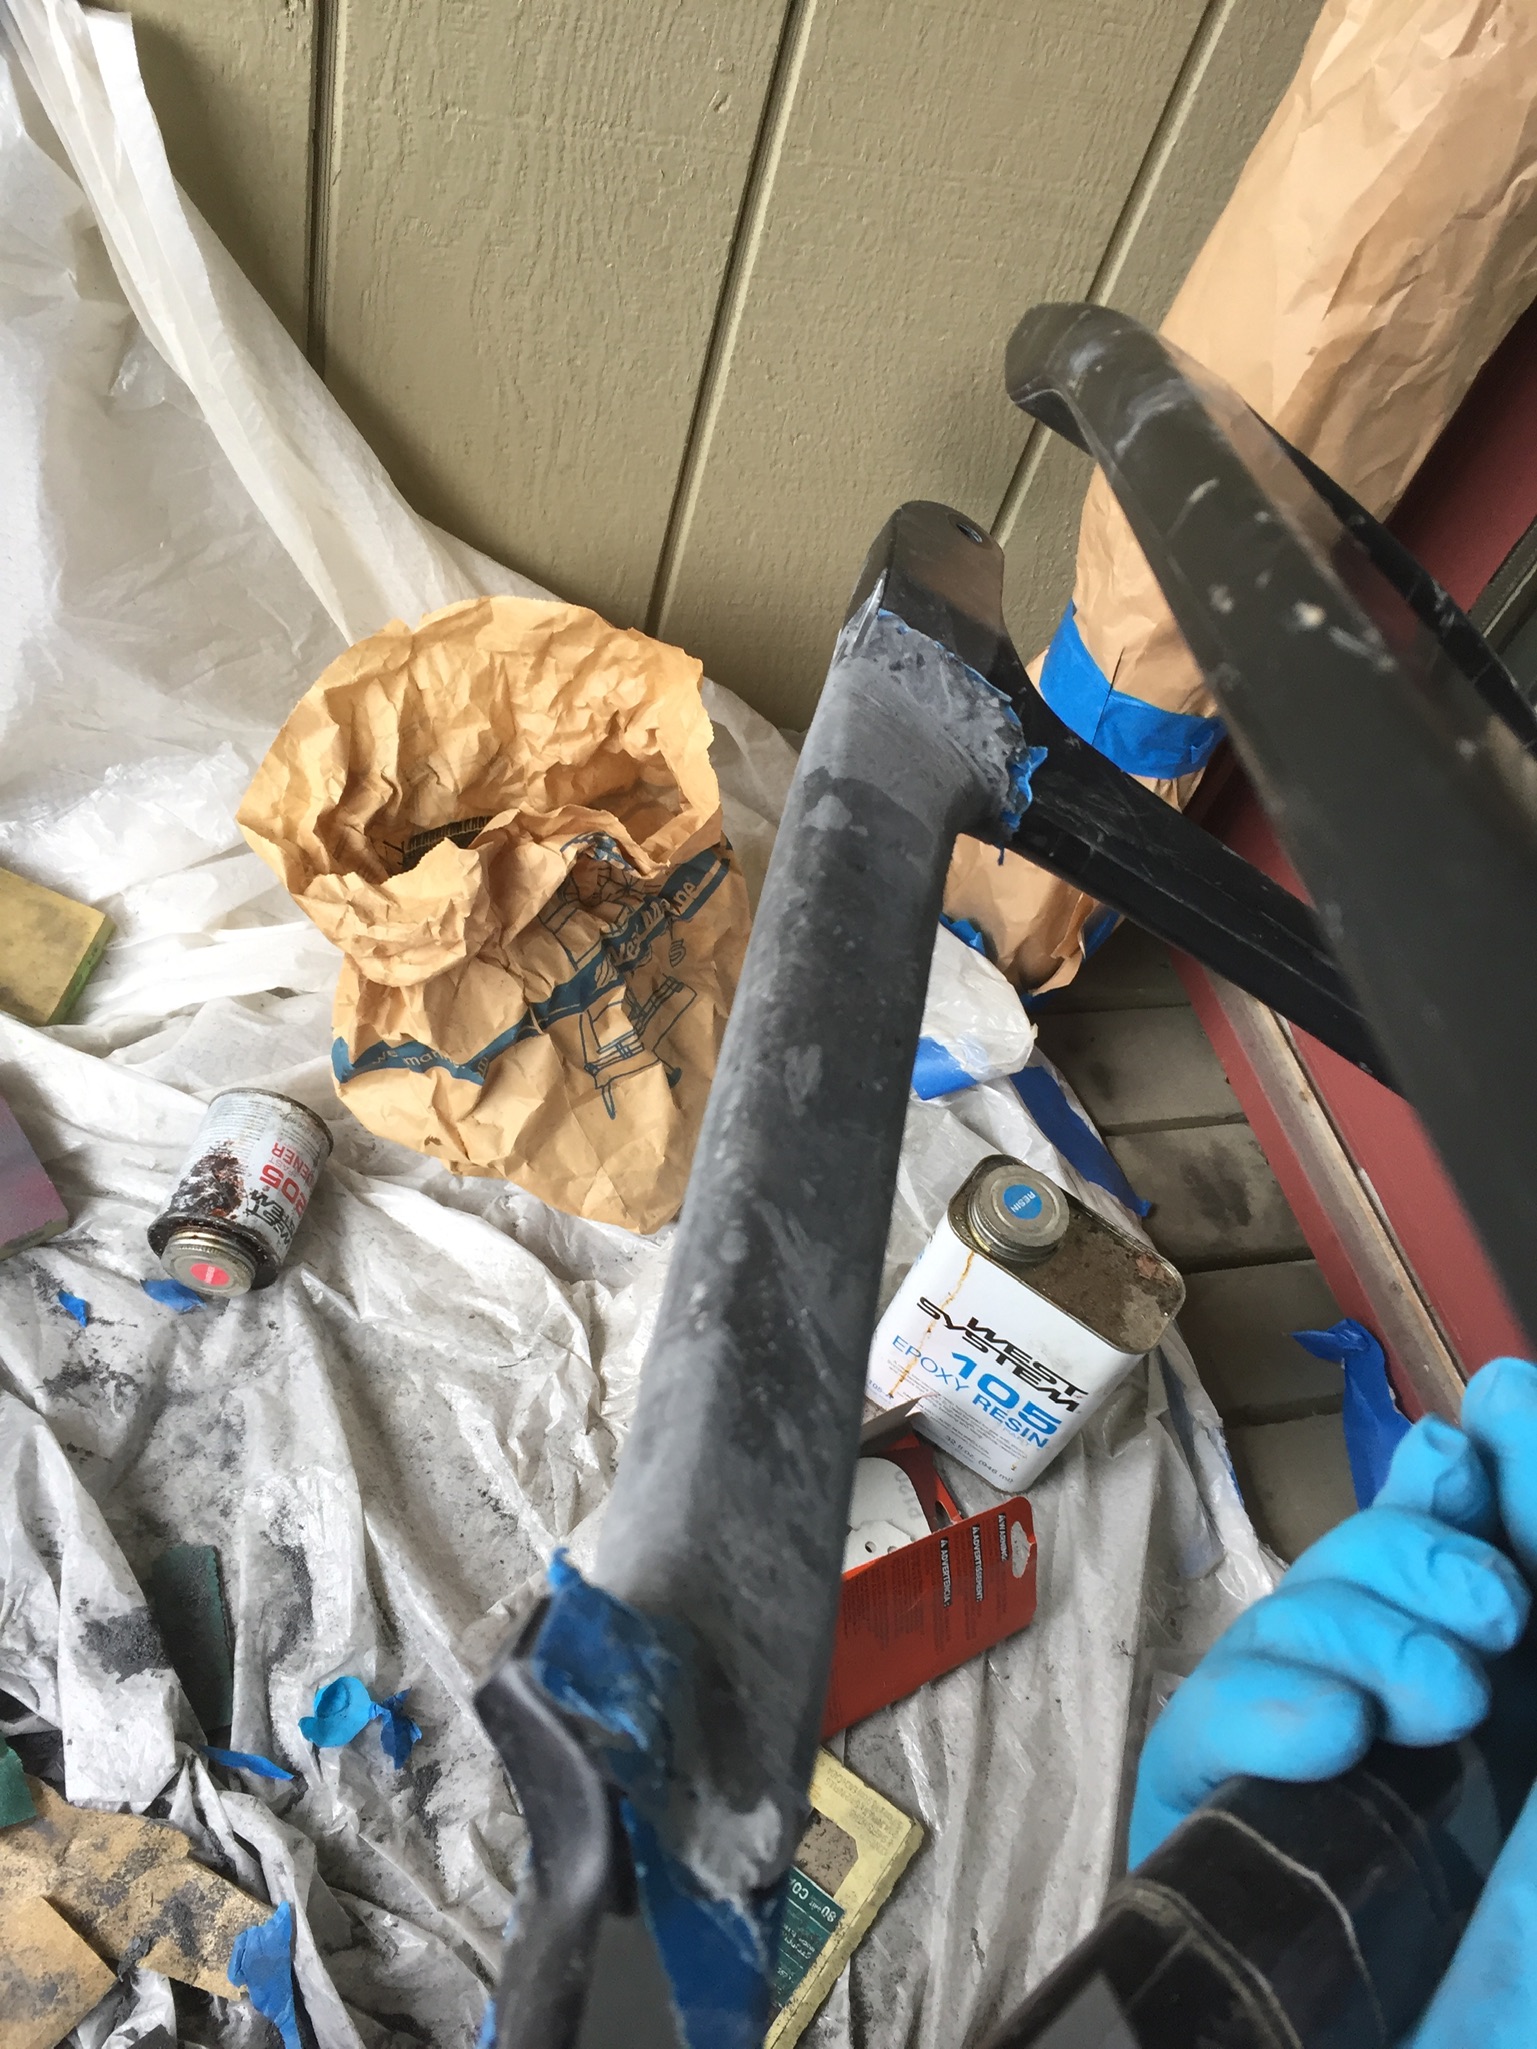
Speaking of resin, I'm using West System 205 and 105, it worked great before and others have reported using it. Got it at West Marine, but the industrial shop I visited for the CF likely had proper stuff too. I "painted" the surface with resin, then wrapped, then added some more resin, repeated the process, laying down opposing helical strips. Because you can't exactly make a continuous "tube" anymore, this is kind of the next best thing.
The next step is going to be ugly and time consuming too, sanding it all down to one smooth shape. I am going to use a power-sander for this and probably hand finish it with some fine grit.
Picked up a yard of CF at local industrial composite supply shop.
As with any composite, it hardens to the temperature of the day, meaning the warmer the day, the stronger the cure and strength. This typically isn't a huge issue unless it's 50 degrees and raining outside (thankfully it's the opposite of that today, warm and sunny). It wouldn't make any sense to cure in cold damp area.
The CF is pretty damn fragile by itself, that's the first issue to work around. Cut bigger than you think you'll need, the edges fray all over the place. Cut more than you think you'll need. I did and it was barely sufficient. I ended up laying 4 strips in a helical pattern and then a bigger cosmetic layer over it. It ends up being pretty ugly usually at this and the next stage. The tape squeezes the air out and helps eliminate voids, it's medical tape, which is porous and the resin seems to go right through it (good). All in all this part is messy as hell, carbon goes everywhere, resin drips everywhere, have extra gloves nearby.
Speaking of resin, I'm using West System 205 and 105, it worked great before and others have reported using it. Got it at West Marine, but the industrial shop I visited for the CF likely had proper stuff too. I "painted" the surface with resin, then wrapped, then added some more resin, repeated the process, laying down opposing helical strips. Because you can't exactly make a continuous "tube" anymore, this is kind of the next best thing.
The next step is going to be ugly and time consuming too, sanding it all down to one smooth shape. I am going to use a power-sander for this and probably hand finish it with some fine grit.
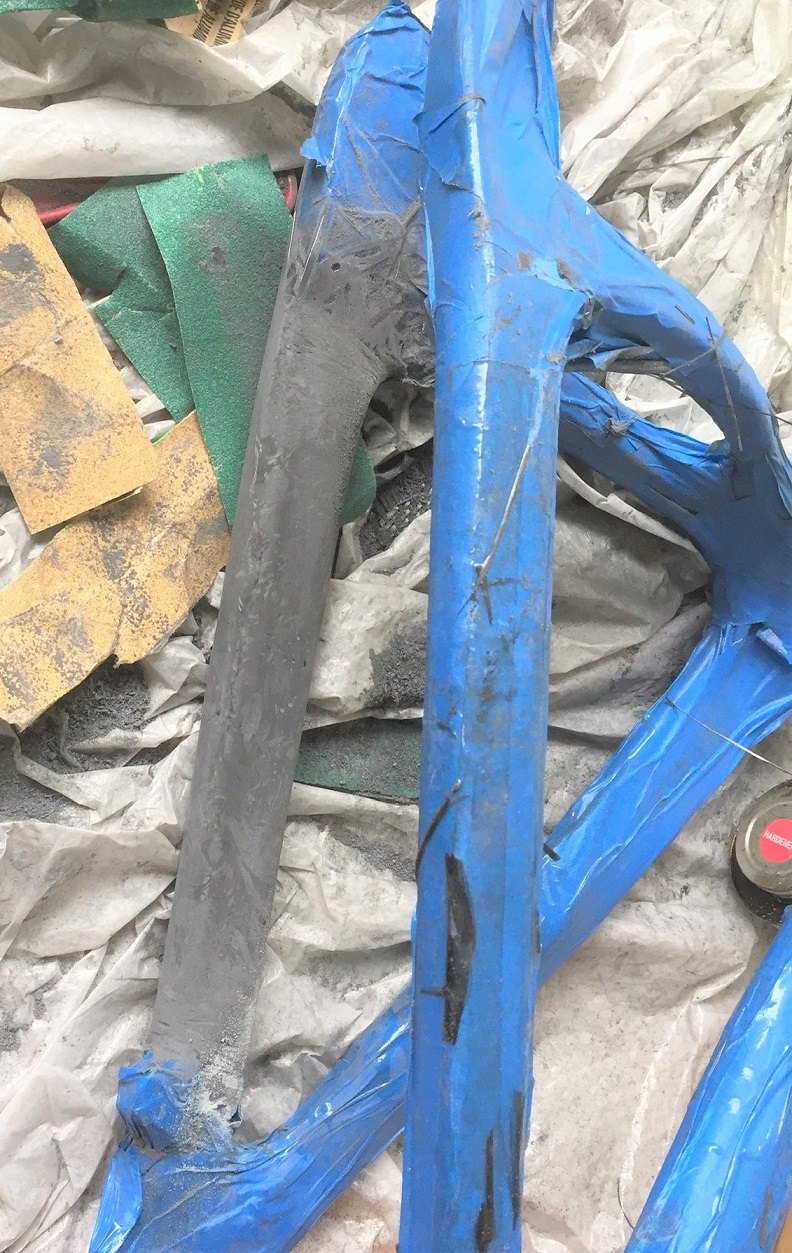
I literally just spent half the day sanding this thing down. This is the worst part of it, there's no real easy way to do it with the nooks and crannies/angles that have to be sanded. Power tools help a bit, but a lot of it just doesn't lend it'self to those kind of tools. The tape I wrapped with for squeezing the CF down was super annoying too. In retrospect I probably used too much and I probably should have gotten the no-stick wrap tape that they sell at composite shops for this purpose. Not sure if they had it, but again, this is the most time consuming part and anything to help make it go faster is nice.
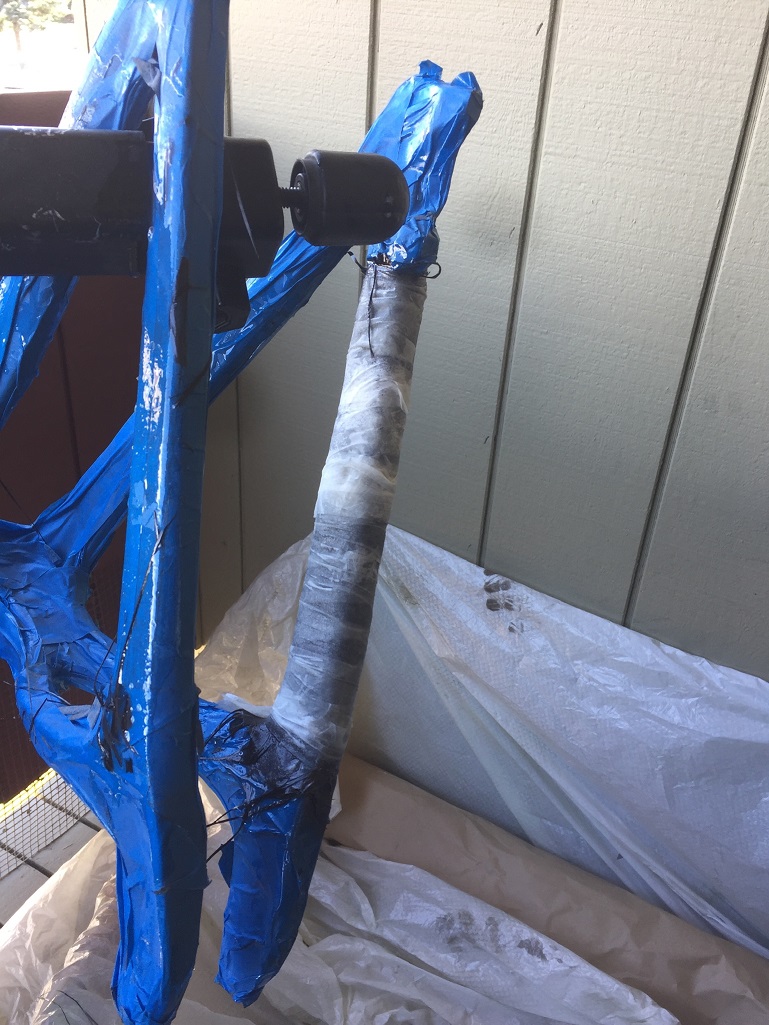
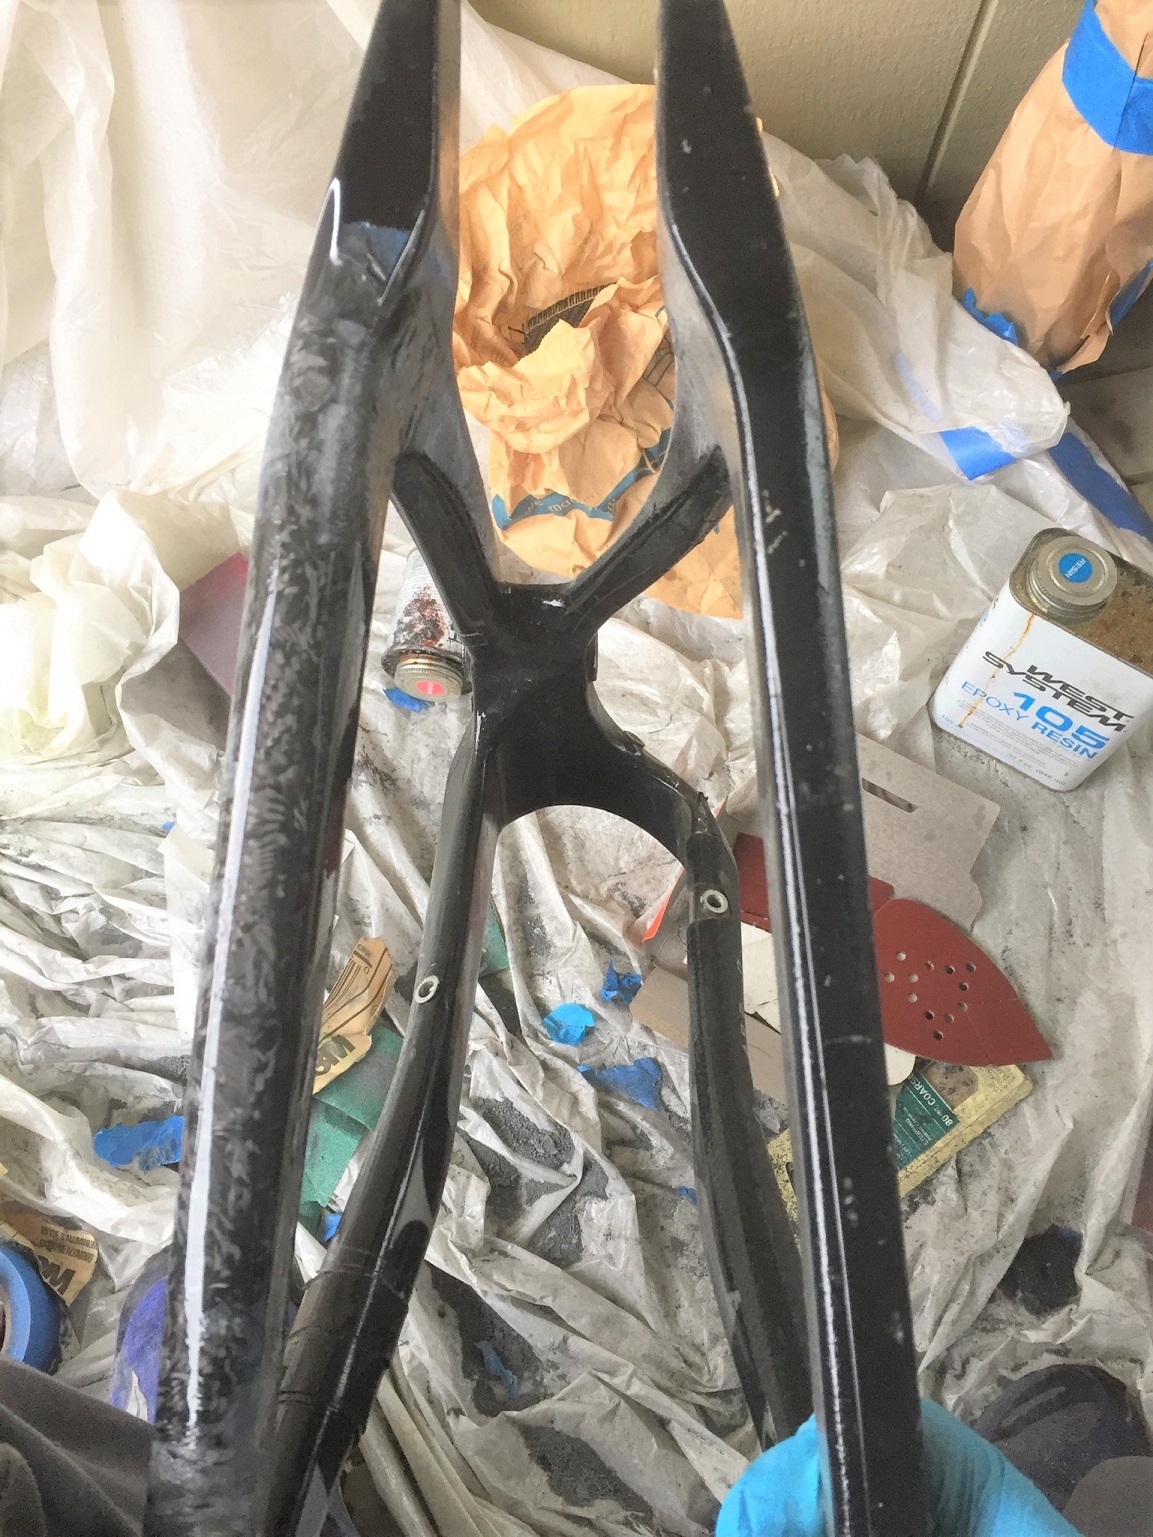
Starting to resemble a seat-stay:
Trying to show the difference in seat-stay size. Given the compromised structure, I wanted to build it up pretty big.
Still quite a bit of sanding to go. You can't see the structural layers that were wrapped in the helix patterns, they are too far down.
I got a little bit of tape overlap at the edges, where I decided to wrap excess carbon and then later sand it down, but it's just not practical to sand down completely. I'll clean it up the best I can. The crack was about 2/3rds up the chainstay.
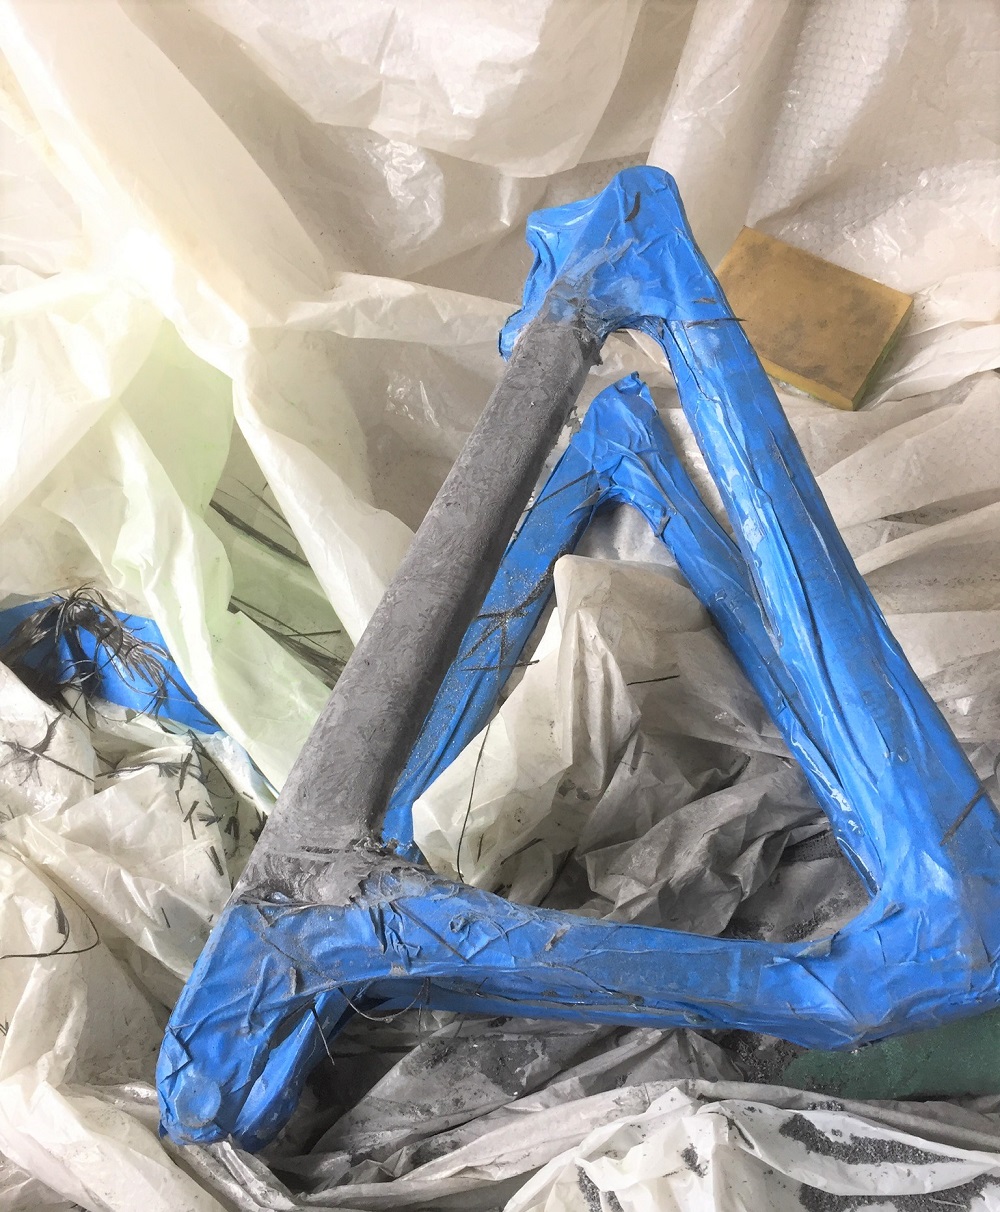
It looks cool when you spray it with alcohol for cleaning:
I was thinking of just leaving it raw, but you know, UV...so I'll clear coat it a few times, then spray it black, then a few more clear coats.
Starting to resemble a seat-stay:
Trying to show the difference in seat-stay size. Given the compromised structure, I wanted to build it up pretty big.
Still quite a bit of sanding to go. You can't see the structural layers that were wrapped in the helix patterns, they are too far down.
I got a little bit of tape overlap at the edges, where I decided to wrap excess carbon and then later sand it down, but it's just not practical to sand down completely. I'll clean it up the best I can. The crack was about 2/3rds up the chainstay.
It looks cool when you spray it with alcohol for cleaning:
I was thinking of just leaving it raw, but you know, UV...so I'll clear coat it a few times, then spray it black, then a few more clear coats.
Last edited:

Looks solid.I literally just spent half the day sanding this thing down. This is the worst part of it, there's no real easy way to do it with the nooks and crannies/angles that have to be sanded. Power tools help a bit, but a lot of it just doesn't lend it'self to those kind of tools. The tape I wrapped with for squeezing the CF down was super annoying too. In retrospect I probably used too much and I probably should have gotten the no-stick wrap tape that they sell at composite shops for this purpose. Not sure if they had it, but again, this is the most time consuming part and anything to help make it go faster is nice.
Starting to resemble a seat-stay:
View attachment 147849
View attachment 147850
Trying to show the difference in seat-stay size. Given the compromised structure, I wanted to build it up pretty big.
View attachment 147851
View attachment 147852
Still quite a bit of sanding to go. You can't see the structural layers that were wrapped in the helix patterns, they are too far down.
I got a little bit of tape overlap at the edges, where I decided to wrap excess carbon and then later sand it down, but it's just not practical to sand down completely. I'll clean it up the best I can. The crack was about 2/3rds up the chainstay.
View attachment 147853
It looks cool when you spray it with alcohol for cleaning:
View attachment 147855
I was thinking of just leaving it raw, but you know, UV...so I'll clear coat it a few times, then spray it black, then a few more clear coats.
Even if you wanted to replace it, do you think Turner would have any replacements? Sounded like he was low on linkages when I broke the DHR a few seasons ago...
Out of curiosity why no dummy hub in the rear axle to make sure its straight?
It was straight, although it cracked pretty well on the seat-stay, it didn't crack all the way through the stay, so maybe 1/2, but that's just one stay and there's far more structure overall reinforcing it. I took the triangle off the bike and it was solid, not bent or unable to remove The portion of the structure coming up from the BB area has another arm that attaches to the seatstay, so it's fairly difficult for it to be out of alignment. It basically doesn't "bend"...it cracks.Looks solid.
Even if you wanted to replace it, do you think Turner would have any replacements? Sounded like he was low on linkages when I broke the DHR a few seasons ago...
Out of curiosity why no dummy hub in the rear axle to make sure its straight?
As far as replacements, I think there isn't a lot of hope. Turner has been helping people out with other stuff, linkages, bolts and other fittings, but it's doubtful there's any stock of these things left.
All back together and ready to ride. Not going for aesthetics at all, used some packing tape over the paint. Hope to test it today or tomorrow, but it's kind of wet outside and I'm waiting on some parts for another bike to make it better, so hopefully soon. Couldn't find the other barrel nut when it came time to put everything back together, so found a 1/4" at the hardware store and bolt, had to drill out the caliper adapter slightly. If it doesn't turn up soon, I'll ask DT if he has any.
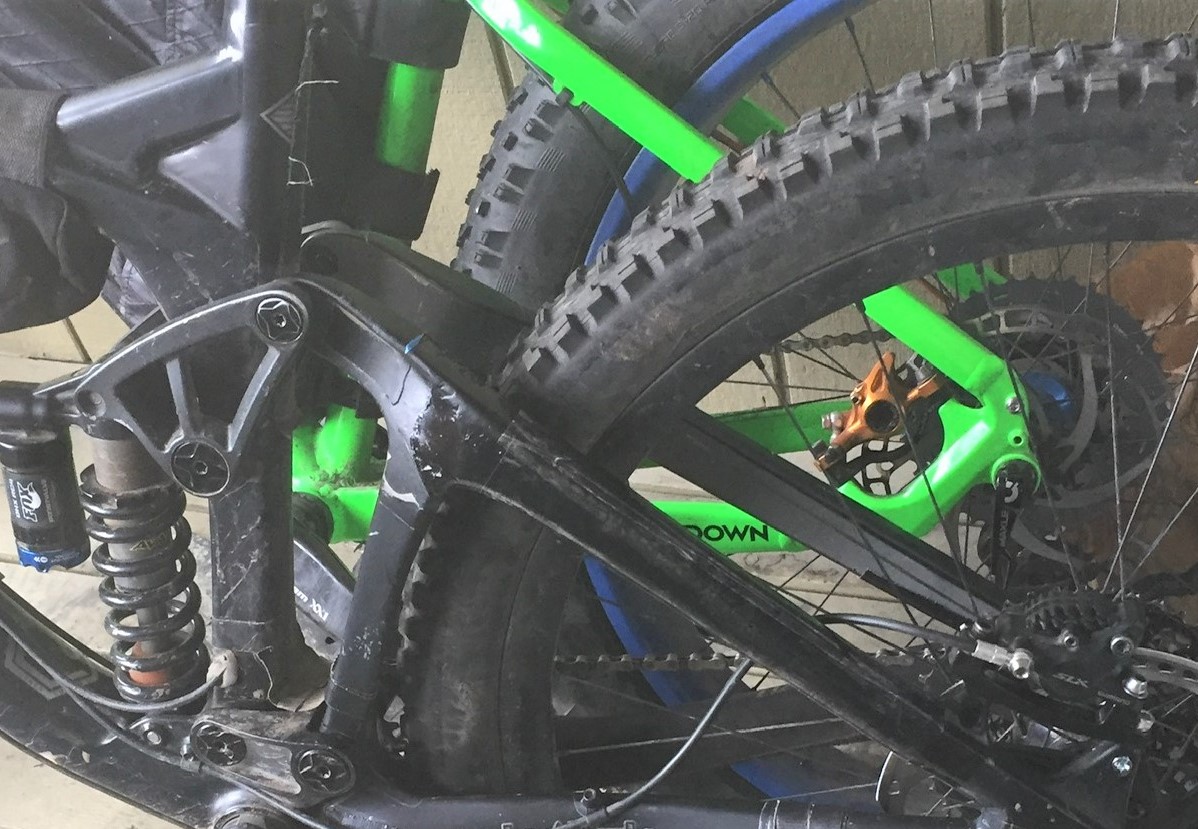
Need to sideload that wheel on some flattish turnsBack in Black. Ripping the local freeride/dh-ish trails, probably at about 70-80% speed (which cases jumps, so even better testing!). No signs of issues.
View attachment 147927
View attachment 147929

Oh, I did much better than that, steep drop ins that you can almost, but not quite boost, where the wheel gets jammed into certain lines that aren't in the same direction you are going. Time will tell though, but I hit it pretty hard today.Need to sideload that wheel on some flattish turns

I told my airworthiness buddies I'm counting it towards my A&P. They asked me what autoclave I used.This repair needs a 337 form.

I had thought about asking what you used to pull vacuum, but then I imagined it winding up in the no context thread.I told my airworthiness buddies I'm counting it towards my A&P. They asked me what autoclave I used.
As with Plummet's repair of his RM on mtbr, we are wrapping to eliminate voids, there are a few ways to do this and some specifically made non-stick products for it that make it easier, probably not 100% void free, but IME with my previous repair, good enough. The hardener cures the resin just fine at 60F, the day I was doing it was at least 70 and bright sunshine, so I picked a good day (relative to what we have to work with). It says do not cure below 40 on it and there are other hardeners that supposedly work better at lower temps, but my general composite knowledge says cooler curings results in weaker structures.I had thought about asking what you used to pull vacuum, but then I imagined it winding up in the no context thread.
It kind of depends on how fancy you want to get, obviously I'm not worried about the lightest structure for strength to weight, the original structure was rectangular and now it's more oval, which means more material on the curved sections outside of the original rectangle, in addition to the layups on the rectangle. This and using more layers probably helps to mitigate some of the other factors.
I've heard for real bad breaks of people inserting wooden dowels as something to lay the CF on where the previous structure is basically gone, but this would probably apply to a fairly limited amount of situations IMO. You need something to lay the CF against, or you just run into the same void problem and resin penetration on the backside of the CF, the resin will just drip into the tube/stay.
And if what's required is too fancy, then you are SOL and at least need to send it in to a proper repair facility. There's no good way to apply pressure and eliminate voids out of complex shapes using this method. It's great for a tube-break or rock impact in an accessible area, but those smaller more complex carbon structures are not feasible IMO. Same thing with rims IMO, just not feasible to repair.
Last edited:
Nice work! It’s amazing how easy it is to repair carbon frames.
Electrical tape doesn’t stick to epoxy and you can poke lots of holes in it with a pin to let out some epoxy and get a lighter laminate. You can use electrical tape to stop the epoxy from going outside of your work area too.
Also, heat shrink release tape would be ideal for that seatstay repair and make the sanding process much easier and faster. But hopefully you don’t need do anymore repairs in the future. You heat up the tape with a hot air gun and it squeezes out more epoxy and increases compaction. It comes off real easy and is pretty cool stuff.
For more complex shapes a vacuum bag setup is necessary however depending on the break, I bet you could get creative with a tube for an inflatable bladder inside some electrical tape. You just need compaction and squeeze out some resin between the layers. Most breaks are on convex shapes which are easy to fix with tape methods.
It's kind of mind-blowing to me, but damn if it doesn't seem to be working fine (on two bikes). Someone on MTBR threw up the "proper weave, cure method, blah blah blah", but west-system is pretty simple and you just over-build the part, not like you are trying to make it the same 3 or whatever layers it was originally, pack that shit on and make it stronger. It also only adds a tiny amount of weight, so might as well overbuild it.Nice work! It’s amazing how easy it is to repair carbon frames.
Electrical tape doesn’t stick to epoxy and you can poke lots of holes in it with a pin to let out some epoxy and get a lighter laminate. You can use electrical tape to stop the epoxy from going outside of your work area too.
Also, heat shrink release tape would be ideal for that seatstay repair and make the sanding process much easier and faster. But hopefully you don’t need do anymore repairs in the future. You heat up the tape with a hot air gun and it squeezes out more epoxy and increases compaction. It comes off real easy and is pretty cool stuff.
For more complex shapes a vacuum bag setup is necessary however depending on the break, I bet you could get creative with a tube for an inflatable bladder inside some electrical tape. You just need compaction and squeeze out some resin between the layers. Most breaks are on convex shapes which are easy to fix with tape methods.
Yeah me too! It‘s way easier than I ever thought! I repaired a couple frames with electrical tape and pinholes (BCD did this technique a lot)) and then later heat release tapes. Then, I got a vacuum bagging setup last winter and build 4 super wide pow snowboards this past winter. I couldn‘t believe how good they rode. I wanna make more stuff.It's kind of mind-blowing to me, but damn if it doesn't seem to be working fine (on two bikes). Someone on MTBR threw up the "proper weave, cure method, blah blah blah", but west-system is pretty simple and you just over-build the part, not like you are trying to make it the same 3 or whatever layers it was originally, pack that shit on and make it stronger. It also only adds a tiny amount of weight, so might as well overbuild it.
My next project is to cut out the slackish seat tube on a Gambler frame and glue/carpet fibre in a new one with a steeper seat angle for a dropper post. Then I could have a Super Ransom or a Poor Gambler? This one feels ambitious so I keep procrastinating... I already welded up a frame jig and cut out a donner seatpost. Now I just gotta go for it! I have access to a lot of high end carbon engineers at Scott so I can ask them what they think of my layups, epoxies, temps and plans. They think I’m crazy but usually give me very good advice. Btw, they tell me to taper out the Cf layers so you don’t create a stress riser at the end of your repair.
easycomposites in the UK is a good source for bike building carbon supplies. Entropy Super Sap resin is nice to work with if you want it to be a little less toxic, spend more money and stronger than the West Systems. I used 5 different kinds of resin in the last year and they all seem to work fine. The more expensive resins are easier to work with and have stronger bonds but I doubt you and I are at the level where we would notice much more than the increase in price.
Anybody else playing with carbon?
No, but a housemate of mine from college runs his own composites company. He had been doing automotive composites, but then the company moved to Detroit to better support oem for GM. He stayed in Vermont and has expanded into other realms. He gets some funding from DARPA these days.Anybody else playing with carbon?

Looks like it needs to go on a fiber-rich diet? Does Turner have any swingarms in stock?

Turner RFX 27.5" Full Suspension Frame
Turner RFX 27.5" Full Suspension Frame The Turner RFX, first introduced in 1999, began life as one of the first purpose-built ‘free ride’ bikes renowned for excellent descending manners and efficient pedaling in a world where few bikes could do both. Subsequent models set new standards for...
 cambriabike.com
That's still way too much for something that old. They'd have better luck probably parting out the swingarms for people like me, but it'd still have to be pretty cheap. That's good for DT though, he moved that inventory. AFAIK, seeing other people that have asked, there are no frames/swingarms left at Turner. They still supply some of the hardware and small parts, but all the big stuff is gone.Turner RFX 27.5" Full Suspension Frame
Turner RFX 27.5" Full Suspension Frame The Turner RFX, first introduced in 1999, began life as one of the first purpose-built ‘free ride’ bikes renowned for excellent descending manners and efficient pedaling in a world where few bikes could do both. Subsequent models set new standards for...
No use in keeping this thing going indefinitely, everything has it's time. The other vertical support had evidence of the same process going on, except much less advanced. I was still in the process of sanding in the picture. There are a few other areas I want to beef up or that got some excessive nicks over the years. Plan to run this until a new frame arrives. I had a time where I was running kind of an excessively low spring rate and I have to wonder if the damage wasn't mainly caused by that. I'm also pretty hard on bikes though, so nothing gets babied.
So another year and a half?Plan to run this until a new frame arrives.
Well yeah, like why else would I go through all of this to fix it.So another year and a half?
Agreed.That's still way too much for something that old. They'd have better luck probably parting out the swingarms for people like me, but it'd still have to be pretty cheap. That's good for DT though, he moved that inventory. AFAIK, seeing other people that have asked, there are no frames/swingarms left at Turner. They still supply some of the hardware and small parts, but all the big stuff is gone.
No use in keeping this thing going indefinitely, everything has it's time. The other vertical support had evidence of the same process going on, except much less advanced. I was still in the process of sanding in the picture. There are a few other areas I want to beef up or that got some excessive nicks over the years. Plan to run this until a new frame arrives. I had a time where I was running kind of an excessively low spring rate and I have to wonder if the damage wasn't mainly caused by that. I'm also pretty hard on bikes though, so nothing gets babied.
He shifted all of his prior inventory to them quite a while ago. I'm grateful he's still got small service parts available though. My plans to replace wife and my Burner this year isn't happening due to the total lack of availability.
-
This site uses cookies to help personalise content, tailor your experience and to keep you logged in if you register.
By continuing to use this site, you are consenting to our use of cookies.