R
RideMonkey
Guest
By Damn True
The K.I.S.S. Principle. Or, how to build a chain retention device that just plain works.
There are few truths in engineering and design. There are as many routes from A to B, so to speak, as there are engineers. One truth that however cannot be denied is that the simpler a system is the more likely it is to work. Rube Goldbergs of the world need not apply.
John Heim is something of a mad scientist. By day an engineer for THE most prestigous lab on the west coast, and by night toiling away in his Pacifica, CA garage building the stuff that fuels his passion for Mt. Biking. I knew Jon was working on something. He kept it shrouded in secrecy for months. Testing it himself on what amounts to his own personal outdoor R&D lab. The Crack. One afternoon this winter we crossed paths and I noticed something different on his bike which is something of a rolling test bed for his inventions. He reluctantly admitted that he was developing a 3-ring chain retention device.
<center>/media/reviews/heim/3-4.jpg</center>
The Heim-3 Guide is aimed at a different sort of rider. The REAL free-riders. Not the guys riding lightly veiled DH bikes off of cliffs and schoolhouses or doing the Urban fandago of grinds and picks, but the kind of rider that wants to do everything. Free to climb in your granny gear, free to blast down rough technical single track, free to haul-arse in the big ring, free to ride uphill, downhill, XC, DS, and even race DH on your free-ride bike, free to ride where ever and over whatever you please. Most of all, free to do so without the hassle, and possible danger of dropping a chain at an inopportune moment.
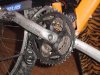
The 3-Guide featuers a simple collection of parts arranged to provide for just that. The body of the guide is a machine bent and stamped stainless steel unit. Rust free of course, and finished with a rough surface designed to grip, rather than slip between the BB shell and cup. The roller itself is a lathe turned hunk of Delerin riding on a pair of sealed roller bearings. The durometer rating is of course top-secret, but is specd to find a balance between quiet operation and wear reduction. The roller is of a taperd design with an outboard flange.
Here lies the beauty of the 3-Guide. Adjusted properly the guide is always directing the chain in the outboard direction, and preventing it from dropping to the next lower ring or dropping completely. The roller features an outer flange that overlaps the big ring preventing the chain from dropping off the outside of the chainring assembly.
So how tough is it to install and adjust? Now I am no bike mechainc, though I would like to think that my Aviation and Semiconductor manufacturing equipment experience has provided me with higher than average mechainical skills. It took me about 20 minutes to install the 3-Guide. All that is required is to drop the driveside chainrings, pull the BB cup, and place the stainless steel body between the cup and shell. At this point you need to merely place the body at an angle at which the roller axle will reside at roughly ¼ above the lowest point of the big ring. Tighten the BB cup and the rough finish of the guide bites into both the cup and the BB shell perventing movement. Throw the rings back on the bike and you can get started on the adjustments. The roller adjustment is simple. All that is needed is a 5mm allen and a 10mm wrench. Yup, Jon used common hardware in the sizes you already have in your bike tool kit. The roller is adjusted to provide for constant contact with the chain without binding. A quick tweak of the rear deurailler was all that was needed. Some applications may require a minor (1-3 links) adjustment in chain length. Thats it. Seriously. I can safely say that anyone who can perform the simplest of adjustments to their bike can install this in less than an hour. If you dont feel confidant in that, it will take your LBS about 20 min. Cheap.
<center>/media/reviews/heim/3-3.jpg</center>
Testing the guide.
Jon sold me a guide just days before I left on a month long trip to Malaysia. With only the following instructions. Beat the heck out of it, and honestly tell people what you think. Jon knows me pretty well, and knows when he asks me to beat on a part that I will show it little mercy.
I decided to be as rough on it as I possibly could. Vowing to not adjust, clean, or lube any part of the drivetrain unless something broke. I rode the thing in mud, sand, and sloppy wet jungle. The soil consistancy over there is odd. The best description I can give is little balls of quartz that crush grinding into every crevice mixed with a clay second only to Alabama red in its sticky/gooey factor. The drivetrain of my Joker and in turn the 3-Guide was bathed in the stuff. Over the month of riding in Malaysia I rode all over the Island on both trail and road, rain or shine, climbing, decending, jumping over some of the most challenging trails I have ever ridden and I had absolutely zero problems. Not one instance of dropping the chain, no chain suck (a nifty plus to the guide) and no missed shifts. Riding the thing is transparent. The only hint of its presance is a slight almost unnoticeable vibration caused by the chain links passing over the roller. The thing is simple, and it works.
Picking nits.
The only thing I can see is a potential problem, though it didnt happen, with stuff snagging on the guide and bending it. An errant madrone branch, or kudzu vine for those of you in the south could perhaps snag between the roller and chainring. Jon tells me however that the production bodies will have a bit of extra material and an extra bend for even better rigidity.
At an MSRP of just under $75 the thing is downright cheap considering its performance. I challenge you to find something better.
Potential dealers or individual buyers can get your own by contacting Jon Heim at:
MONTARA DESIGN PACIFICA, CA 94044
(650)-359-1326
Email: INFO@MONTARAMTB.COM
More info and photos are on his site at www.montaramtb.com.
The K.I.S.S. Principle. Or, how to build a chain retention device that just plain works.
There are few truths in engineering and design. There are as many routes from A to B, so to speak, as there are engineers. One truth that however cannot be denied is that the simpler a system is the more likely it is to work. Rube Goldbergs of the world need not apply.
John Heim is something of a mad scientist. By day an engineer for THE most prestigous lab on the west coast, and by night toiling away in his Pacifica, CA garage building the stuff that fuels his passion for Mt. Biking. I knew Jon was working on something. He kept it shrouded in secrecy for months. Testing it himself on what amounts to his own personal outdoor R&D lab. The Crack. One afternoon this winter we crossed paths and I noticed something different on his bike which is something of a rolling test bed for his inventions. He reluctantly admitted that he was developing a 3-ring chain retention device.
<center>/media/reviews/heim/3-4.jpg</center>
The Heim-3 Guide is aimed at a different sort of rider. The REAL free-riders. Not the guys riding lightly veiled DH bikes off of cliffs and schoolhouses or doing the Urban fandago of grinds and picks, but the kind of rider that wants to do everything. Free to climb in your granny gear, free to blast down rough technical single track, free to haul-arse in the big ring, free to ride uphill, downhill, XC, DS, and even race DH on your free-ride bike, free to ride where ever and over whatever you please. Most of all, free to do so without the hassle, and possible danger of dropping a chain at an inopportune moment.
The 3-Guide featuers a simple collection of parts arranged to provide for just that. The body of the guide is a machine bent and stamped stainless steel unit. Rust free of course, and finished with a rough surface designed to grip, rather than slip between the BB shell and cup. The roller itself is a lathe turned hunk of Delerin riding on a pair of sealed roller bearings. The durometer rating is of course top-secret, but is specd to find a balance between quiet operation and wear reduction. The roller is of a taperd design with an outboard flange.
Here lies the beauty of the 3-Guide. Adjusted properly the guide is always directing the chain in the outboard direction, and preventing it from dropping to the next lower ring or dropping completely. The roller features an outer flange that overlaps the big ring preventing the chain from dropping off the outside of the chainring assembly.
So how tough is it to install and adjust? Now I am no bike mechainc, though I would like to think that my Aviation and Semiconductor manufacturing equipment experience has provided me with higher than average mechainical skills. It took me about 20 minutes to install the 3-Guide. All that is required is to drop the driveside chainrings, pull the BB cup, and place the stainless steel body between the cup and shell. At this point you need to merely place the body at an angle at which the roller axle will reside at roughly ¼ above the lowest point of the big ring. Tighten the BB cup and the rough finish of the guide bites into both the cup and the BB shell perventing movement. Throw the rings back on the bike and you can get started on the adjustments. The roller adjustment is simple. All that is needed is a 5mm allen and a 10mm wrench. Yup, Jon used common hardware in the sizes you already have in your bike tool kit. The roller is adjusted to provide for constant contact with the chain without binding. A quick tweak of the rear deurailler was all that was needed. Some applications may require a minor (1-3 links) adjustment in chain length. Thats it. Seriously. I can safely say that anyone who can perform the simplest of adjustments to their bike can install this in less than an hour. If you dont feel confidant in that, it will take your LBS about 20 min. Cheap.
<center>/media/reviews/heim/3-3.jpg</center>
Testing the guide.
Jon sold me a guide just days before I left on a month long trip to Malaysia. With only the following instructions. Beat the heck out of it, and honestly tell people what you think. Jon knows me pretty well, and knows when he asks me to beat on a part that I will show it little mercy.
I decided to be as rough on it as I possibly could. Vowing to not adjust, clean, or lube any part of the drivetrain unless something broke. I rode the thing in mud, sand, and sloppy wet jungle. The soil consistancy over there is odd. The best description I can give is little balls of quartz that crush grinding into every crevice mixed with a clay second only to Alabama red in its sticky/gooey factor. The drivetrain of my Joker and in turn the 3-Guide was bathed in the stuff. Over the month of riding in Malaysia I rode all over the Island on both trail and road, rain or shine, climbing, decending, jumping over some of the most challenging trails I have ever ridden and I had absolutely zero problems. Not one instance of dropping the chain, no chain suck (a nifty plus to the guide) and no missed shifts. Riding the thing is transparent. The only hint of its presance is a slight almost unnoticeable vibration caused by the chain links passing over the roller. The thing is simple, and it works.
Picking nits.
The only thing I can see is a potential problem, though it didnt happen, with stuff snagging on the guide and bending it. An errant madrone branch, or kudzu vine for those of you in the south could perhaps snag between the roller and chainring. Jon tells me however that the production bodies will have a bit of extra material and an extra bend for even better rigidity.
At an MSRP of just under $75 the thing is downright cheap considering its performance. I challenge you to find something better.
Potential dealers or individual buyers can get your own by contacting Jon Heim at:
MONTARA DESIGN PACIFICA, CA 94044
(650)-359-1326
Email: INFO@MONTARAMTB.COM
More info and photos are on his site at www.montaramtb.com.
Attachments
-
 11.2 KB Views: 11,489


 Who cares ? If the product works good for him.
") )
)