Yep, i created a guide to upgrading your Judy tt's from 80 to 100+ a little bit or so. heres the guide.
Tools- Long Screw driver or something long enough to fit down the fork, Allen keys (Park tool), Old bike Grips, scissors, Ratchet tool with socket to fit the top caps, a rag ( to keep things clean like your hands or anything that gets on the parts wile out of the fork)
Directions-
Note- Removal of legs will one most likely Void warranty, 2 may require force and 3 removing the springs off the rods may also require force.
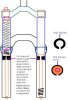
1st- take your fork and or hole bike somewhere you will not loose parts on the floor or from little siblings eating them. A good thing to do is to get a lid of a plastic container to out things in. In advance when you pop it open this is what the internals should look like. (see picture 1 for example) When you take it apart and there is a missing spacer its still inside the leg, you will have to dig it out.
2nd- on the bottom of the legs there will be a little screw on each leg next to the drop outs, take these out then slide the legs off.
3rd- take off the top caps on the fork, watch your self if you decide to screw them out by hand when there loose, they might spring out at you on the travel side if you have your fork set to tight pre-load.
4th- Take out the spring on the pre-load side and lay it on something where you wont loose it. Now slide the Spacers and elastomers off the rods then slide the rods out the top of the fork.
NOTE: placing the parts on order when they come out will help you remember which way they go back in.
5th- Take the little springs off the rods, and replace them with the rubber spacers (directions for spacers in Picture 2) (hint: if the springs dont want to come off the rods, take the screw driver and pry them off from the head of the rod)
6th- Slide the preload side rod up back inside the top of the fork then in after it, put in the small spring, the connector piece then the big spring. NOTE: Screwing the cap back in on the preload side will be difficult if its adjusted to a tighter preload. Spin the cap so the preload loosens so you will have an easier time putting it in.
7th- With the long screw driver, Put the other rod with your new top out spring down the Dummy leg ( non pre-load side) if you choose not to put the elastomers back in you will have to use the screw driver to hold it there wile screwing the legs to the rods. (Hint; what I did was use a piece of metal I found to put in the leg behind the dummy rod and then screwed the cap back in a bit just so I could screw the bolts into the rods. If you choose my method you will have to remember to TAKE IT OUT (I forgot and thought my fork was broken)
NOTE: If you want this is Optional, you can take the extra spring and put it down the leg of the non pre-load side to help with the bottom out. (See picture 2 for example where the extra spring can go)
8th- Slide the legs back on to the upper half of the fork. If the rods are not fitting to the holes correctly just move them a bit with a screw driver by sticking it in the hole where the bolts screw in.
9th- Put the bolts back in the fork.
If you chose not to use the elastomers or didnt have the right size piece of something to put into the fork, now is the time to use the screw driver. The cap should be off. Now stick the screw driver in where the cap goes till the rod is up all the way so you can see it from the screw hole. It will be easier if someone held the screw driver for you. Now make shure the rod is in the correct spot so you can screw the bolt in. NOTE: Make shure the bolts are tight in there, you wouldnt want the legs sliding off when you go for a ride.
NOTE: If you want, you can put your pre-load in the right leg instead of the left by just switching which leg you put everything back in.
Tools- Long Screw driver or something long enough to fit down the fork, Allen keys (Park tool), Old bike Grips, scissors, Ratchet tool with socket to fit the top caps, a rag ( to keep things clean like your hands or anything that gets on the parts wile out of the fork)
Directions-
Note- Removal of legs will one most likely Void warranty, 2 may require force and 3 removing the springs off the rods may also require force.
1st- take your fork and or hole bike somewhere you will not loose parts on the floor or from little siblings eating them. A good thing to do is to get a lid of a plastic container to out things in. In advance when you pop it open this is what the internals should look like. (see picture 1 for example) When you take it apart and there is a missing spacer its still inside the leg, you will have to dig it out.
2nd- on the bottom of the legs there will be a little screw on each leg next to the drop outs, take these out then slide the legs off.
3rd- take off the top caps on the fork, watch your self if you decide to screw them out by hand when there loose, they might spring out at you on the travel side if you have your fork set to tight pre-load.
4th- Take out the spring on the pre-load side and lay it on something where you wont loose it. Now slide the Spacers and elastomers off the rods then slide the rods out the top of the fork.
NOTE: placing the parts on order when they come out will help you remember which way they go back in.
5th- Take the little springs off the rods, and replace them with the rubber spacers (directions for spacers in Picture 2) (hint: if the springs dont want to come off the rods, take the screw driver and pry them off from the head of the rod)
6th- Slide the preload side rod up back inside the top of the fork then in after it, put in the small spring, the connector piece then the big spring. NOTE: Screwing the cap back in on the preload side will be difficult if its adjusted to a tighter preload. Spin the cap so the preload loosens so you will have an easier time putting it in.
7th- With the long screw driver, Put the other rod with your new top out spring down the Dummy leg ( non pre-load side) if you choose not to put the elastomers back in you will have to use the screw driver to hold it there wile screwing the legs to the rods. (Hint; what I did was use a piece of metal I found to put in the leg behind the dummy rod and then screwed the cap back in a bit just so I could screw the bolts into the rods. If you choose my method you will have to remember to TAKE IT OUT (I forgot and thought my fork was broken)
NOTE: If you want this is Optional, you can take the extra spring and put it down the leg of the non pre-load side to help with the bottom out. (See picture 2 for example where the extra spring can go)
8th- Slide the legs back on to the upper half of the fork. If the rods are not fitting to the holes correctly just move them a bit with a screw driver by sticking it in the hole where the bolts screw in.
9th- Put the bolts back in the fork.
If you chose not to use the elastomers or didnt have the right size piece of something to put into the fork, now is the time to use the screw driver. The cap should be off. Now stick the screw driver in where the cap goes till the rod is up all the way so you can see it from the screw hole. It will be easier if someone held the screw driver for you. Now make shure the rod is in the correct spot so you can screw the bolt in. NOTE: Make shure the bolts are tight in there, you wouldnt want the legs sliding off when you go for a ride.
NOTE: If you want, you can put your pre-load in the right leg instead of the left by just switching which leg you put everything back in.

")
") .
.