Well it's a common issue, and while it's been covered roughly there's still a lot of mis-information going around so I figure this may help.
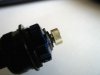
First pic:
This is the cause of the issue. The floodgate knob sits up a bit from the black plastic (exaggerated in pic), and is free to move up and down; which seems to cause a leak from the o-ring that seals the floodgate shaft by dislodging it. What we want to do is a) stop the play, and b) stop the o-ring from being dislodged by putting some pressure on it.
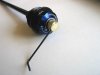
Second pic:
Use a 1.5mm allen key to loosen the grub screw that holds the floodgate knob on. Slide it off. Notice in this pic that below the knob i've got a washer that takes up the gap from pic 1.. that's what you want to achieve.
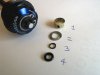
Third pic:
1. Floodgate knob
2. The washer I used to fill the gap. It was an ISTD disc brake shim, perfect sizing. 10mm OD, 6mm ID, and ~0.9mm thick.
3. I used this to put pressure on o-ring when floodgate knob was reinstalled. It's a small cutting of shimano brake hose (~0.9mm thick), with the inner core removed.. use your imagination for alternatives if you don't have this.
4. The stock o-ring. You can pick it out gently with something thin and preferably not too sharp.
So basically, the washer stops the knob moving the shaft up and down, while the piece of brake hose holds the shim seated down firmly. If you have a collection of small o-rings, definitely squeeze in something with a slightly thicker cross-section as well (but the same ID, or smaller) - I think I may have done this, and if so that's the one pictured. I forget...
After you've got your materials, the method is to put everything on in the order 4,3,2,1 (lining up the floodgate's grubscrew with the flat on the shaft). Next, hold the knob squeezed down firmly to compress the o-ring, and then tighten the grubscrew. If the floodgate feels too hard to turn (a little resistance is good), undo the grubscrew, back off your squeezing pressure a little and try again, or use something less tall for part #3. Have a play around until you achieve the desired result - and go for a ride. If you did it right, it will be leak free.")
To cover a few misconceptions i've heard - no it's not a big issue, no you don't need to replace the damper, and getting it replaced is not likely to fix the problem permanently - a little creativity on the other hand will.
First pic:
This is the cause of the issue. The floodgate knob sits up a bit from the black plastic (exaggerated in pic), and is free to move up and down; which seems to cause a leak from the o-ring that seals the floodgate shaft by dislodging it. What we want to do is a) stop the play, and b) stop the o-ring from being dislodged by putting some pressure on it.
Second pic:
Use a 1.5mm allen key to loosen the grub screw that holds the floodgate knob on. Slide it off. Notice in this pic that below the knob i've got a washer that takes up the gap from pic 1.. that's what you want to achieve.
Third pic:
1. Floodgate knob
2. The washer I used to fill the gap. It was an ISTD disc brake shim, perfect sizing. 10mm OD, 6mm ID, and ~0.9mm thick.
3. I used this to put pressure on o-ring when floodgate knob was reinstalled. It's a small cutting of shimano brake hose (~0.9mm thick), with the inner core removed.. use your imagination for alternatives if you don't have this.
4. The stock o-ring. You can pick it out gently with something thin and preferably not too sharp.
So basically, the washer stops the knob moving the shaft up and down, while the piece of brake hose holds the shim seated down firmly. If you have a collection of small o-rings, definitely squeeze in something with a slightly thicker cross-section as well (but the same ID, or smaller) - I think I may have done this, and if so that's the one pictured. I forget...
After you've got your materials, the method is to put everything on in the order 4,3,2,1 (lining up the floodgate's grubscrew with the flat on the shaft). Next, hold the knob squeezed down firmly to compress the o-ring, and then tighten the grubscrew. If the floodgate feels too hard to turn (a little resistance is good), undo the grubscrew, back off your squeezing pressure a little and try again, or use something less tall for part #3. Have a play around until you achieve the desired result - and go for a ride. If you did it right, it will be leak free.
To cover a few misconceptions i've heard - no it's not a big issue, no you don't need to replace the damper, and getting it replaced is not likely to fix the problem permanently - a little creativity on the other hand will.
Attachments
-
 21.1 KB Views: 2,510
 -
 47.7 KB Views: 2,541
 -
 40.2 KB Views: 3,158
 Oil drips when you turn it up side down or have the floodgate set to its firm side.
