Ok, so I was kicking myself the other night after I took apart my broken X9 shifter to replace a broken lever (I was planning on using one from my broken X7) because I didn't pay attention to anything as I ripped it apart. I got it all back together, but it wasn't working properly. But then I figured out what I did wrong, and I thought it'd be nice to have a pictorial assembly incase anyone else ever has a problem like I did.
In any case, here's the skinny:
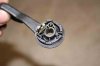
Step 1 (first pic):
Starting with just the thumb lever, put in the upside-down bronze "h" into it's place. There's only one place it will go, so just look for it. Next, put the spring on the "+" post so that it applies pressure to the "h" and holds it against the inside wall of the lever.
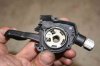
Step 2 (second pic):
Put the larger of the two coiled springs on the thumb lever. It will have a piece of the wire that extends towards the center; put that into the groove.
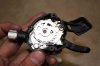
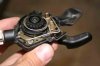
Step 3 (3rd pic - you get it now):
Put the bronze circle piece with 5 notches and a hole on top - the "h" should stick up into the hole and one of the notches. Then place the entire thumb lever and all it's new friends into the lower housing. Attach the spring to the body via the little spring hole. Be sure to keep your finger on the lever as the spring is now working against you.
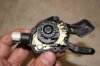
Step 4:
Keeping your finger on the thumb lever so that the spring doesn't shoot off, drop in the finger lever attached to the big plate - there are two little grooves that the pins (the long one that the finger lever pivots on) will slide into. Be sure that the "h"piece is still visible. If it is, then you should be able to let go of the thumb lever. If it isn't, move the thumb forward and/or back until it is, then apply pressure down on the big plate. Next, put the gear-looking piece on top how the picture shows.
In any case, here's the skinny:
Step 1 (first pic):
Starting with just the thumb lever, put in the upside-down bronze "h" into it's place. There's only one place it will go, so just look for it. Next, put the spring on the "+" post so that it applies pressure to the "h" and holds it against the inside wall of the lever.
Step 2 (second pic):
Put the larger of the two coiled springs on the thumb lever. It will have a piece of the wire that extends towards the center; put that into the groove.
Step 3 (3rd pic - you get it now):
Put the bronze circle piece with 5 notches and a hole on top - the "h" should stick up into the hole and one of the notches. Then place the entire thumb lever and all it's new friends into the lower housing. Attach the spring to the body via the little spring hole. Be sure to keep your finger on the lever as the spring is now working against you.
Step 4:
Keeping your finger on the thumb lever so that the spring doesn't shoot off, drop in the finger lever attached to the big plate - there are two little grooves that the pins (the long one that the finger lever pivots on) will slide into. Be sure that the "h"piece is still visible. If it is, then you should be able to let go of the thumb lever. If it isn't, move the thumb forward and/or back until it is, then apply pressure down on the big plate. Next, put the gear-looking piece on top how the picture shows.
Attachments
-
 6.9 KB Views: 21,641
 -
 7.6 KB Views: 22,771
 -
 10.5 KB Views: 32,582
 -
 10.8 KB Views: 33,986
")

